Host webpages with Drive


With Drive, you can make web resources - like HTML, CSS and Javascript files - viewable as a website.
To host a webpage with Drive:
  1. Open Drive at drive.google.com and select a file.
  2. Click the Share button at the top of the page.
  3. Click Advanced in the bottom right corner of the sharing box.
  4. Click Change....
  5. Choose On - Public on the web and click Save.
  6. Before closing the sharing box, copy the document ID from the URL in the field below "Link to share". The document ID is a string of uppercase and lowercase letters and numbers between slashes in the URL.
  7. Share the URL that looks like "www.googledrive.com/host/[doc id] where [doc id] is replaced by the document ID you copied in step 6.
Anyone can now view your webpage.

Computer Science C++ Projects FREE programs

Projects in C++ 
1.Student database system
2.Hang Man
3.School fee enquiry Management System
4.SuperMarket Billing System
5.3D Bounce in OpenGL
6.Bus Reservation System
7.Puzzel Game in wxWidget
8.Data Exchange between Notepad and Excel (Visual C++)
9.Employee's Management System

Projects in c
1.Libray management
2.Snake Game
3.Quize Game
4.Department store system
5.Tic-tac-toe game
6.Personal Dairy Management System
7.Telecom Billing Management System
8.Bank Management System
9.Contacts Management
10.Medical Store Management System

Ready-made C++ Projects
C++ Project for Graphic Scientific Calculator C++ Project for Graphic Scientific Calculator Baloon-Shooting-Game Baloon-Shooting-Game
Digital Clock Digital Clock C++ Project on Railway-2 C++ Project on Railway-2
C++ project on Banking C++ Project on Telephone Directory
Railway Reservation System C++ Project on Airline Reservation System
C++ Project on Library Management System Library Management C++ Project on Banking System
C++ Project on Supermarket Billing System C++ Project on Student Report Card
C++ Project on Snake And Ladder Game C++ Project on Diabetes Detection
C++ Project on Address Book C++ Project on Rotation Of Triangle
C++ Project on Restaurant Billing System C++ Project on Hospital Management System
C++ Project on Inventory Management System C++ Project on Tic Tac Toe Game
C++ Project on Casino Game C++ Project on GK Quiz
C++ Project on Virtual Calender C++ Project on Solar System
C++ Project on Office Management C++ Project on Decimal to Binary Convertor
C++ Project on Cruise Travel Management C++ Project on Ludo Game
C++ Project on Forever Calender C++ Project on Mobile Phone Shop
C++ Project on Binary Search tree C++ Project on Shuffling Cards
C++ Project on Virus Joke C++ Project on Program For Distributer
C++ Project on Moving Ball Screensaver C++ Project on Resume Maker
C++ Project on Sudoku C++ Project on Report Card
C++ Project on Stack Data Structure Implementation C++ Project on Merging Two Doubly Linked Lists
C++ Project on Hangman Game C++ Project on Generic Stack Class
C++ Tetris Game C++ Project on Tetris Game

Android: complete widget tutorial (including source code)

Source code
Hereby I share my widget tutorial source code. Feel free to download.

1. Create widget layout
layout is defined as any other layout in Android app. My layout consists of just one button and one imageView (/res/layout/widget_demo.xml).

<?xml version="1.0" encoding="utf-8"?>
<LinearLayout xmlns:android="http://schemas.android.com/apk/res/android"
    android:layout_width="fill_parent"
    android:layout_height="wrap_content"
    android:orientation="vertical"
    android:layout_margin="5sp"
    android:background="@android:drawable/alert_dark_frame" >

    <ImageView
        android:id="@+id/widget_image"
        android:layout_width="110sp"
        android:layout_height="110sp"
        android:layout_gravity="center"
        android:src="@drawable/wordpress_icon" />

    <Button
        android:id="@+id/widget_button"
        android:layout_width="wrap_content"
        android:layout_height="wrap_content"
        android:layout_gravity="center"
        android:text="Change it!" />

</LinearLayout>

Please remember that views that can be used in widget layout are limited. It depends on android version you are developing for. Find out more here. Make sure that view that you are using is supported by target android SDK version.

2. Create App Widget Provider declaration
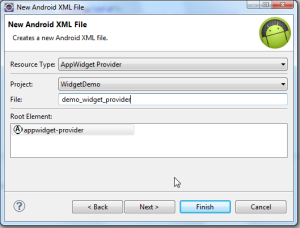
This is another xml file that tells android OS that this application has a widget (display your widget in OS widget list). Create it with wizard:
File → New → Android → Android XML File

Widget Provider creation wizard

Widget size should be defined in dp. Usually widget size is related to one icon size on desktop (74 x 74 dp). Size should be mutiplication of such blocks. It may be calculated using formula:
((Number of columns or rows)* 74)

Please remember however to leave some space for margins. My widget 
has width and height equal to two icon blocks (146 dp x 146 dp):

<?xml version="1.0" encoding="utf-8"?>
<appwidget-provider xmlns:android="http://schemas.android.com/apk/res/android" 
    android:initialLayout="@layout/widget_demo" 
    android:minHeight="146dp" 
    android:minWidth="146dp"
    android:updatePeriodMillis="1000000" 
    >
</appwidget-provider>

3. Create AppWidgetProvider onUpdate implementation
Create class extending AppWidgetProvider. It will be responsible for updating your widget while Android OS requests it (e.g. widget is shown to user).
Here you have to set button listener (as a PendingIntent, because RemoteViews supports only that way of communication)

public class MyWidgetProvider extends AppWidgetProvider {

 @Override
 public void onUpdate(Context context, AppWidgetManager appWidgetManager,
   int[] appWidgetIds) {

  RemoteViews remoteViews = new RemoteViews(context.getPackageName(), R.layout.widget_demo);
  remoteViews.setOnClickPendingIntent(R.id.widget_button, buildButtonPendingIntent(context));

  pushWidgetUpdate(context, remoteViews);
 }

 public static PendingIntent buildButtonPendingIntent(Context context) {
  Intent intent = new Intent();
     intent.setAction("pl.looksok.intent.action.CHANGE_PICTURE");
     return PendingIntent.getBroadcast(context, 0, intent, PendingIntent.FLAG_UPDATE_CURRENT);
 }

 public static void pushWidgetUpdate(Context context, RemoteViews remoteViews) {
  ComponentName myWidget = new ComponentName(context, MyWidgetProvider.class);
     AppWidgetManager manager = AppWidgetManager.getInstance(context);
     manager.updateAppWidget(myWidget, remoteViews);  
 }
}

In buildButtonPendingIntent I set that after widget button press the intent will be sent. So now… it is time to catch that intent in Broadcast Receiver and handle widget update.

4. Register MyWidgetProvider in AndroidManifest.xml
Add these lines in <application/> tag:

        <receiver android:name="MyWidgetProvider" >
            <intent-filter >
                <action 
                    android:name="android.appwidget.action.APPWIDGET_UPDATE" />
            </intent-filter>

            <meta-data
                android:name="android.appwidget.provider"
                android:resource="@xml/demo_widget_provider" />
        </receiver>

5. Create Broadcast Intent receiver
This will be called for pending intents updates. Widgets are built on RemoteViews (views that are managed by another process than your application). This is why they communicate with your app by PendingIntents.

public class MyWidgetIntentReceiver extends BroadcastReceiver {

 private static int clickCount = 0;

 @Override
 public void onReceive(Context context, Intent intent) {
  if(intent.getAction().equals("pl.looksok.intent.action.CHANGE_PICTURE")){
   updateWidgetPictureAndButtonListener(context);
  }
 }

 private void updateWidgetPictureAndButtonListener(Context context) {
  RemoteViews remoteViews = new RemoteViews(context.getPackageName(), R.layout.widget_demo);
  remoteViews.setImageViewResource(R.id.widget_image, getImageToSet());

  //REMEMBER TO ALWAYS REFRESH YOUR BUTTON CLICK LISTENERS!!!
  remoteViews.setOnClickPendingIntent(R.id.widget_button, MyWidgetProvider.buildButtonPendingIntent(context));

  MyWidgetProvider.pushWidgetUpdate(context.getApplicationContext(), remoteViews);
 }

 private int getImageToSet() {
  clickCount++;
  return clickCount % 2 == 0 ? R.drawable.me : R.drawable.wordpress_icon;
 }
}

WARNING!!!
Since you are creating RemoteViews from scratch in Broadcast Receiver (using constructor with new keyword), you must refresh widget layout from scratch. Mainly: refresh the button listeners pending intents. This will help you to avoid issues like this and that.

6. Register Broadcast Receiver in AndroidManifest.xml
Add the following lines in <application/> tag:

<receiver
    android:name="MyWidgetIntentReceiver"
    android:label="widgetBroadcastReceiver" >
    <intent-filter>
        <action android:name="pl.looksok.intent.action.CHANGE_PICTURE" />
    </intent-filter>

    <meta-data
        android:name="android.appwidget.provider"
        android:resource="@xml/demo_widget_provider" />
</receiver>

7. That’s all!
Download the source code and enjoy! Feel free to customize widget according to your needs!

Here you will find some another widget tutorial. Maybe it will also be useful for you

XCode on Windows: How to Develop for Mac or iOS on a PC

Would you like to develop software for Mac OS X or iOS? While it’s easy to develop apps for Linux and Windows on any platform, developing software for Mac requires a toolset called XCode, designed and built by Apple specifically for Mac OS X.
XCode is an incredibly powerful piece of software. Not only is it a complete toolset for developing Mac apps; it’s also an interface builder, testing application, and asset management toolkit.
In this simple guide, you’ll learn how to use XCode on Windows – something that’s normally impossible. All you’ll need is a Windows PC, a copy of Mac OS X, an Apple account, and an Internet connection.
Is this your first time using XCode? Learn how to program software for Mac and iOS with our 1 Hour XCode Introduction.

Installing a virtual PC application with Mac OS X

Since XCode only runs on Mac OS X, you’ll need to be able to simulate an installation of Mac OS X on Windows. This is surprisingly easy to do with virtualization software like VMWare or open source alternative VirtualBox.
For the purpose of this guide, we’ll be using VirtualBox. If you use a different virtual computer application, the process is much the same. Since VirtualBox is open source and free to use, it’s worth downloading it if you don’t already have a copy installed.
Have you never used VirtualBox before? Learn how to use this powerful virtual PC application by enrolling in our course, QuickStart! – Virtual Box. In addition to Mac OS X, VirtualBox can also be used to run Linux and other operating systems.
Running a virtual computer is quite a demanding process, and you’ll need to have a fairly powerful PC for it to operate successfully. You’ll also need a PC with hardware similar to that of a standard, Apple-constructed iMac, MacBook, or Mac Pro.
To successfully emulate a Mac using a Windows PC, you’ll need the following:
  • A Dual Core Intel processor
  • At least 2GB of RAM (4GB+ recommended)
  • Hardware Virtualization
Is your PC too weak to emulate a Mac properly? Learn how to build a powerful PC for gaming, app development, and more with our Learn How to Build a Computer course.
You’ll also need an installation disc for Mac OS X. You can purchase this online from the Apple Store or, if you already own a MacBook, iMac, or Mac Pro, you can use the install disc you received with your computer.
Once you’ve installed VirtualBox, open the application and choose to install Mac OS X Server 64 Bit. Provide the virtual computer with at least 2GB of RAM (if you have more than 8GB of RAM, choose 4GB+) and more than 30GB of hard disk space.
VirtualBox will automatically configure the operating system, but you’ll still need to make a few changes manually. Open the Settings menu and carry out the following changes:
  • On the System tab, uncheck Enable EFI
  • On the Processor tab, select at least two CPUs
  • On the Display tab, increase the video memory to at least 128MB

Installing Mac OS X and booting your virtual machine

Finally, you’ll need to download a Hackboot boot loader to install OS X. You can find a Hackboot install file by searching Google – in this case, you’ll need Hackboot 1 and Hackboot 2, as well as your OS X disc, to complete the installation.
Select your Hackboot 1 disc image, and then start the virtual machine. Your virtual machine will boot, and you’ll see an OS X screen. Using the menu at the bottom of the screen, launch the disc drive that contains your OS X installation disc.
From here, you’ll need to follow the installation instructions for Mac OS X. It takes several minutes to install the operating system. Once the process is finished, you’ll need to switch off your virtual machine and change your boot disc.
Reopen VirtualBox and, leaving all of your other settings the same, switch your boot disc from Hackboot 1 to Hackboot 2. You’ll boot into a screen with two icons. Select Mac OS X and press Enter to initiate the Mac OS X boot sequence.
During the Mac OS X configuration sequence, you’ll need to enter your Apple ID. This is necessary for downloading the XCode toolset later, so make sure you enter a valid Apple account when you configure your operating system.

Installing XCode on your Mac OS X virtual machine

Once you’ve configured your Mac OS X virtual machine, installing XCode is relatively easy. Before you install XCode, you’ll want to configure your virtual machine to your preferred resolution and settings using the System Preferences menu.
Is this your first time using Mac OS X? If you’re a PC user, finding your way around in the new interface can be a challenge. Enroll in Using Mac OS X for Windows Users to learn the basics of the OS X interface, from the Dock to features like Spotlight.
From here, installing XCode is simple. Open the App Store application from the dock and type XCode into the search bar. You might need to reenter your account details, or enter them for the first time if you didn’t do so during Mac OS X configuration.
Navigate to the XCode app and click Install Now to download it. If you don’t have an Apple account, you’ll need to create one in order to download the XCode toolset for your virtual machine.
XCode is quite a large application, and downloading it could take anywhere from a minute to several hours, depending on your Internet connection speed. Once your download is finished, open Applications and click XCode to launch the installer.
Once the installation process is complete, you’ll be able to use XCode within your virtual machine to program apps for Mac OS or iOS. You can also download other Mac apps to use on your virtual machine, although they may not run smoothly.

Developing iOS Apps and more using XCode

XCode is an incredibly powerful toolkit for app development. It’s also refreshingly easy to use, especially for developers accustomed to cumbersome and complicated programming software for PC.

Learn more about how to use XCode by reading our iOS programming tutorial. It’s a great overview of the XCode interface, the programming characteristics of iOS, and much more.

Android Tutorial

android image
Android tutorial or android development tutorial covers basic and advanced concepts of android technology. Our android tutorial is developed for beginners and professionals.
Android is a complete set of software for mobile devices such as tablet computers, notebooks, smartphones, electronic book readers, set-top boxes etc.
It contains a linux-based Operating System, middleware and key mobile applications.
It can be thought of as a mobile operating system. But it is not limited to mobile only. It is currently used in various devices such as mobiles, tablets, televisions etc.


Android Sensor Tutorial

Android sensor tutorial covers concept and example of motion sensor, position sensor and environmental sensor.
Android Sensor Tutorial


Web Service Tutorial

Android web service tutorial enables you to interact with other programming language such as Java, .Net, PHP and Python.
Android Web Service


Android Animation

Android animation enables you to rotate, slide and flip images and text.
Android Animation Example

Next TopicWhat is Android


Free Java Projects

Features of Javatpoint Projects

1) All the advance java projects can be downloaded in Eclipse, Myeclipse and Netbeans IDE's.
2) Projects have SRS including Objective of the project, Users of the Project and their Role, Functional Requirement, Non-functional requirement etc.
3) Projects have detailed information of How Project Works?, including Snapshots of the project in the document file with full illustration.
4) You need to create table in the database manually. Go to src folder, there is given Listener class, open this class and see the table structure only. Now create the table in the oracle 10g database. All the column names must be same as mentioned in the table query, id must be primary key and generated by sequence.
5) All the advance java projects uses Oracle 10g database. Here, we are assuming that username is system and password is oracle for the oracle database.


Project NameTechnology
Payment Billing Product ProjectJSP, Javascript, Ajax
Transport CompanyJSP, Javascript, Ajax
Connect GlobeJSP, Javascript, Ajax
Online Banking ProjectJSP, Javascript, Ajax
Online Quiz ProjectJSP, Javascript, Ajax
City Classified and SearchJSP, Javascript, Ajax
Mailcasting ProjectJSP, Javascript, Ajax
Online Library ProjectJSP, Javascript, Ajax
Pharmacy ProjectJSP, Javascript, Ajax
Broadcasting Chat Server ProjectCore Java
Company Mailer ProjectServlet

The Essential Android Game Development Tutorials

andorid-game-dev-tutorials
Games are among the most popular and profitable types of mobile applications. New games are developed and released every day on Google Play and other app marketplaces and once in a while we also come across a Flappy Bird like wonder story. This is a roundup of some of the best tutorials available online on Andorid game development that can be useful to developers in learning how to develop games for Android. Note that this list doesn’t cover any specific game engine or game creation tool, (which will be covered in later posts) but concentrates mainly on game development with Canvas/Open GL.
This set of tutorials is perhaps one of the most popular sources for learning Android game development. The comprehensive series of tutorials is also nicely organized into different units and sections. If you are a complete beginner to Java and Android you can start following the series right from Unit 1, titled “Beginning Java” and which essentially deals with various Java concepts from basics to advanced. Unit 2 & 3 covers various aspects of creating a game and lays down the foundation of gaming concepts (you can skip this too if you have created a game in Java before and are familiar with game development concepts). Unit 4 exclusively deals with Android game development and covers a wide range of topics right from setting up a development environment to creating your Android game.
A tutorial in five parts. First part discusses how to create a drawing surface and a framework for the game, second part covers the basics of how to load and display sprites when developing an Android game, the third installment of the tutorial deals with sprite animations, the fourth part walks you through the concept of collision detection while the final installment of the tutorial shows how to derive input from a user and how to use the input to influence the on-screen action (user input). The tutorial linked here is the final installment of the tutorials as it contains the links to all the previous parts. You can also download the project covered in the tutorial and import it into Eclipse.
OpenGL ES (OpenGL for Embedded Systems)  is an implementation of OpenGL for embedded devices. Android features good support for OpenGL ES and it is also widely used in developing Android games. This tutorial shows how to get started with OpenGL ES 2.0 for Android.
These series of tutorials walks you through the process of creating a simple 2-dimensional game engine for Android from scratch. During the course of development you will learn about design decisions and understand how each component works in a game engine. The series starts with a detailed introduction to OpenGL ES and then progresses to other topics such as setting up your development environment, concepts related to game engine, stage, scenes, sprites, primitive drawing, textures etc.
You can draw 2D objects in Android either on a View or with a Canvas. If you are drawing objects that need to be be redrawn regularly (which is the case in games) Canvas is the better solution. This tutorials walks you through the process of drawing a 2D object with a Canvas and also shows how to use a secondary thread to perform the drawing for better performance.
Another multi-part tutorial on Android game development. This series walks you through the process of developing a hangman game for Android and discusses the core game development concepts right from basics such as setting up your project to developing the user interface and user interaction. The tutorial also deals with topics such as adapters, XML resources, action bar etc. You can also download the source code of the project developed in the course of the tutorial.
A lengthy series of Android game development tutorials that is somewhat outdated but useful nonetheless. The series guides you through the process of developing an Android game right from the conception of the game idea to its execution. You will learn important game development concepts such as a basic game architecture, game loop, sprite animation, particle explosion, bitmap fonts, moving images on screen, MVC pattern, OpenGL ES, OpenGL texture mapping, collision detection etc. The tutorials are also accompanied with relevant illustrations and source code. You can also download the source code and the eclipse project.
This section of the Android documentation is a must read for developers getting started with OpenGL ES in Android. It walks you through the basics of developing applications using OpenGL  and covers topics such as setup, drawing objects, moving drawn elements and responding to touch input. The example code uses the  OpenGL ES 2.0 APIs. It is divided into several sections, each one of which discusses a different aspect of working with OpenGL. Building an OpenGL ES Environment, which starts the series shows you how to create a view container for  OpenGL ES while the next couple of sections guide you through the basics of how to define and draw OpenGL shapes in your application. The rest of the documentation covers various other important topics such as  how to use projection and camera views to get a new perspective on your drawn objects, how to do basic movement and animation of drawn objects, basic interaction with OpenGL graphics etc.
A series of tutorials on OpenGL ES 2.0 that specifically focuses on the 2D aspects of OpenGL ES 2.0 for Android. The tutorials are descriptive and include example source code, which are also available for download. The tutorials cover topics starting from how to render a triangle (first part) to rendering an image, handling input, transforming images, the OpenGL texture system, screens and dimensions etc.
Google Play game services lets you create great game experiences by helping you implement achievement, leaderboards, and real-time multiplaying capability to your game. These elements greatly enhance the game experience for the user/player. A leaderboard allows the players to compare their scores with other players or friends, rewards and achievements encourage better user engagement and multiplayer capability provides a competitive and cooperative experience often using social platforms. In short, you can add a lot to your game experience by utilizing the Google Play Game Services. This official documentation guides you through the basics of how to get started with Google Play Game Services.

Aptitude Book of RS Aggarwal Free Download PDF


                                                             Download from Mirror 1


                                                             Download from Mirror 2

Stellar Data Recovery Crack + Keygen

                                                              ..Download From Here..

Install backtrack on your smart phone

Today we are going to see How to install backtrack  5 on Smartphones and tablets which run on android.For this we have certain Required. Ofcourse the main will be the Android smartphone with 2.1+. Though I recommend 4.0+.In my case ill be using Micromax a110 smartphone.
 

Requirements:

1.Back | track 5 Arm architecture which can be downloaded from the official website of the Back | track Here.
2.A smartphone/tablet which needs to be rooted since it requires root permission to run certain scripts. (micromax a110 as example)
3.Following Android Apps:
BUSYBOX : It acts like a installer and uninstaller.it needs root permission to run.it has gpu cores and can  run linux kernals on android . Link  
Superuser: This app just grants a superuser power to your phone just like “su” does for linux. Link
Terminal Emulator is app that runs a terminal console in android .Link
AndroidVNC is a tool for viewing VNC in Android. Link

Installation:

1.Extract the backtrack folder “BT5-GNOME-ARM” to folder named “BT5” on the root of sd.That’s the top level of the SD card. 
2.Open up the Terminal Emulator

3.Type the command “cd sdcard/BT5”
4.Run this command and you will see root@localhost.
su
sh bootbt
 
5. Now lets run Backtrack GUI with VNC viewer
 startvnc

6. Open android vnc
Nickname : BT5
Password : toortoor
Address : 127.0.0.1
Port : 5901
 7.Click the connect Button and Boom here is your Pentest machine :D