Source code
Hereby I share my widget tutorial source code. Feel free to download.
1. Create widget layout
layout is defined as any other layout in Android app. My layout consists of just one button and one imageView (/res/layout/widget_demo.xml).
Please remember that views that can be used in widget layout are limited. It depends on android version you are developing for. Find out more here. Make sure that view that you are using is supported by target android SDK version.
2. Create App Widget Provider declaration
This is another xml file that tells android OS that this application has a widget (display your widget in OS widget list). Create it with wizard:
Widget size should be defined in dp. Usually widget size is related to one icon size on desktop (74 x 74 dp). Size should be mutiplication of such blocks. It may be calculated using formula:
3. Create AppWidgetProvider onUpdate implementation
Create class extending AppWidgetProvider. It will be responsible for updating your widget while Android OS requests it (e.g. widget is shown to user).
Here you have to set button listener (as a PendingIntent, because RemoteViews supports only that way of communication)
In buildButtonPendingIntent I set that after widget button press the intent will be sent. So now… it is time to catch that intent in Broadcast Receiver and handle widget update.
4. Register MyWidgetProvider in AndroidManifest.xml
Add these lines in <application/> tag:
5. Create Broadcast Intent receiver
This will be called for pending intents updates. Widgets are built on RemoteViews (views that are managed by another process than your application). This is why they communicate with your app by PendingIntents.
WARNING!!!
Since you are creating RemoteViews from scratch in Broadcast Receiver (using constructor with new keyword), you must refresh widget layout from scratch. Mainly: refresh the button listeners pending intents. This will help you to avoid issues like this and that.
6. Register Broadcast Receiver in AndroidManifest.xml
Add the following lines in <application/> tag:
7. That’s all!
Download the source code and enjoy! Feel free to customize widget according to your needs!
Here you will find some another widget tutorial. Maybe it will also be useful for you
Hereby I share my widget tutorial source code. Feel free to download.
1. Create widget layout
layout is defined as any other layout in Android app. My layout consists of just one button and one imageView (/res/layout/widget_demo.xml).
<?xml version="1.0" encoding="utf-8"?>
<LinearLayout xmlns:android="http://schemas.android.com/apk/res/android"
    android:layout_width="fill_parent"
    android:layout_height="wrap_content"
    android:orientation="vertical"
    android:layout_margin="5sp"
    android:background="@android:drawable/alert_dark_frame" >

    <ImageView
        android:id="@+id/widget_image"
        android:layout_width="110sp"
        android:layout_height="110sp"
        android:layout_gravity="center"
        android:src="@drawable/wordpress_icon" />

    <Button
        android:id="@+id/widget_button"
        android:layout_width="wrap_content"
        android:layout_height="wrap_content"
        android:layout_gravity="center"
        android:text="Change it!" />

</LinearLayout>
Please remember that views that can be used in widget layout are limited. It depends on android version you are developing for. Find out more here. Make sure that view that you are using is supported by target android SDK version.
2. Create App Widget Provider declaration
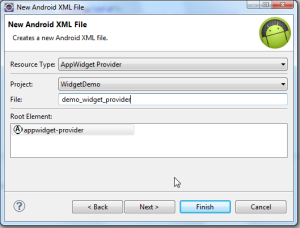
This is another xml file that tells android OS that this application has a widget (display your widget in OS widget list). Create it with wizard:
File → New → Android → Android XML File
Widget Provider creation wizard
Widget size should be defined in dp. Usually widget size is related to one icon size on desktop (74 x 74 dp). Size should be mutiplication of such blocks. It may be calculated using formula:
((Number of columns or rows)* 74)
Please remember however to leave some space for margins. My widget has width and height equal to two icon blocks (146 dp x 146 dp):
<?xml version="1.0" encoding="utf-8"?>
<appwidget-provider xmlns:android="http://schemas.android.com/apk/res/android"
    android:initialLayout="@layout/widget_demo"
    android:minHeight="146dp"
    android:minWidth="146dp"
    android:updatePeriodMillis="1000000"
    >
</appwidget-provider>
3. Create AppWidgetProvider onUpdate implementation
Create class extending AppWidgetProvider. It will be responsible for updating your widget while Android OS requests it (e.g. widget is shown to user).
Here you have to set button listener (as a PendingIntent, because RemoteViews supports only that way of communication)
public class MyWidgetProvider extends AppWidgetProvider {

 @Override
 public void onUpdate(Context context, AppWidgetManager appWidgetManager,
   int[] appWidgetIds) {

  RemoteViews remoteViews = new RemoteViews(context.getPackageName(), R.layout.widget_demo);
  remoteViews.setOnClickPendingIntent(R.id.widget_button, buildButtonPendingIntent(context));

  pushWidgetUpdate(context, remoteViews);
 }

 public static PendingIntent buildButtonPendingIntent(Context context) {
  Intent intent = new Intent();
     intent.setAction("pl.looksok.intent.action.CHANGE_PICTURE");
     return PendingIntent.getBroadcast(context, 0, intent, PendingIntent.FLAG_UPDATE_CURRENT);
 }

 public static void pushWidgetUpdate(Context context, RemoteViews remoteViews) {
  ComponentName myWidget = new ComponentName(context, MyWidgetProvider.class);
     AppWidgetManager manager = AppWidgetManager.getInstance(context);
     manager.updateAppWidget(myWidget, remoteViews);
 }
}
In buildButtonPendingIntent I set that after widget button press the intent will be sent. So now… it is time to catch that intent in Broadcast Receiver and handle widget update.
4. Register MyWidgetProvider in AndroidManifest.xml
Add these lines in <application/> tag:
        <receiver android:name="MyWidgetProvider" >
            <intent-filter >
                <action
                    android:name="android.appwidget.action.APPWIDGET_UPDATE" />
            </intent-filter>

            <meta-data
                android:name="android.appwidget.provider"
                android:resource="@xml/demo_widget_provider" />
        </receiver>
5. Create Broadcast Intent receiver
This will be called for pending intents updates. Widgets are built on RemoteViews (views that are managed by another process than your application). This is why they communicate with your app by PendingIntents.
public class MyWidgetIntentReceiver extends BroadcastReceiver {

 private static int clickCount = 0;

 @Override
 public void onReceive(Context context, Intent intent) {
  if(intent.getAction().equals("pl.looksok.intent.action.CHANGE_PICTURE")){
   updateWidgetPictureAndButtonListener(context);
  }
 }

 private void updateWidgetPictureAndButtonListener(Context context) {
  RemoteViews remoteViews = new RemoteViews(context.getPackageName(), R.layout.widget_demo);
  remoteViews.setImageViewResource(R.id.widget_image, getImageToSet());

  //REMEMBER TO ALWAYS REFRESH YOUR BUTTON CLICK LISTENERS!!!
  remoteViews.setOnClickPendingIntent(R.id.widget_button, MyWidgetProvider.buildButtonPendingIntent(context));

  MyWidgetProvider.pushWidgetUpdate(context.getApplicationContext(), remoteViews);
 }

 private int getImageToSet() {
  clickCount++;
  return clickCount % 2 == 0 ? R.drawable.me : R.drawable.wordpress_icon;
 }
}
WARNING!!!
Since you are creating RemoteViews from scratch in Broadcast Receiver (using constructor with new keyword), you must refresh widget layout from scratch. Mainly: refresh the button listeners pending intents. This will help you to avoid issues like this and that.
6. Register Broadcast Receiver in AndroidManifest.xml
Add the following lines in <application/> tag:
<receiver
    android:name="MyWidgetIntentReceiver"
    android:label="widgetBroadcastReceiver" >
    <intent-filter>
        <action android:name="pl.looksok.intent.action.CHANGE_PICTURE" />
    </intent-filter>

    <meta-data
        android:name="android.appwidget.provider"
        android:resource="@xml/demo_widget_provider" />
</receiver>
7. That’s all!
Download the source code and enjoy! Feel free to customize widget according to your needs!
Here you will find some another widget tutorial. Maybe it will also be useful for you